 First successful results of making home made skyr.
 My previous post about Yule discussed primarily my attempt to make skyr, an Icelandic dairy product that is similar to yogurt. It was meant to be a part of a series of projects over Yule, but an unexpected illness resulted in this being my only one. Skyr is a cultured milk product that has been consumed in Iceland for almost a thousand years, and is even mentioned in Egils saga and Grettis saga. We don’t know exactly what it tasted like, but today it is flavored and eaten in a couple of different ways. The consistency is thicker than most yogurts, with a slightly sour flavor.
My first attempt did not get followed through to completion because of being ill, and I dumped the batch. Even though it smelled and tasted right, the consistency was too thin. It sat around for nearly a week, and I felt that was too long.
My second batch was made with some slight changes, and this morning, I enjoyed it as part of second breakfast. Here, I am sharing the BASIC recipe that I used. I say basic because it is my desire for you to find your own way instead of reproducing exactly what I have done. This recipe will leave you with a basic skyr that will taste like something like plain yogurt or sour crème. You should be able to use it in exactly the same ways. For example, in a dish with a sweet fruit topping, maybe a dusting of brown sugar, or plain over a baked potato with chives and bacon bits. My point is, take this as a framework, and experiment! I’d love to hear how yours turns out! I don’t recommend this recipe for any less than 3 cups of milk. I did this with 2 cups, and ended up with about 12 ounces of skyr, which is 1 ½ to 2 servings of typical yogurt. You will also notice, as I did, that if you homebrew, you already have most of what you need for this recipe!
What you need:
Milk – 2%, whole, vitamin D, or raw is best, from a cow, although other animals milks should work, also. Be sure it does not say “ultra pasteurized” on the label. Pasteurized is OK.
Culture Starter – You can buy a starter from anywhere that sells cheese making supplies. You may have to do a bit of research to find the right one. Alternatively, buy a cup of skyr from a grocery store. Most higher-end grocers carry it or can get it. Be sure it contains live cultures. (If you continue to make skyr on a constant basis, this is a one-time purchase. Your previous batch can serve as a starter for your new batch.)
Food Thermometer – Preferably digital, but you don’t need anything fancy, as long as it reads room temperature up to about 200 degrees Fahrenheit.
A stainless steel pot – Make sure it is of a size that reflects how much you intend to make.
Whisk
A second container of similar size – Can be anything.
Cheese cloth – for straining your curd from the whey.
Colander (optional)
Towel or Blanket – to keep your batch warm while the cultures do their work.
Rennet (optional) – If you have trouble thickening the curd, or if you like yours thicker than the final product here, you can use rennet. Follow the directions with the rennet. I didn’t use it.
Something in which to store the final product. Twelve 12oz mason jars is ideal, not too expensive, and reusable.
Instructions:
1. Put your milk into the stainless steel pot and heat it gently on the stove to 180 degrees Fahrenheit. This is the point that there are small bubbles appearing, the very beginning of boiling. Keep stirring gently with the whisk so that the milk heats evenly and doesn’t burn on the bottom.
2. Turn off the burner and let it cool to 110 degrees Fahrenheit. Either let it sit on the stove and check periodically, or you can set the whole pot, covered, into a sink or other container filled with cold water. Regardless of how cooling takes place, watch the temperature closely. Check it every 5-10 minutes on the stove, and constantly in the water bath. If it cools to lower than 110 degrees, put it back on the heat, but only long enough to raise it back to 110 degrees.
3. Add your starter to the 110 degree milk and mix in thoroughly. I used commercial skyr for a starter, and added a tablespoon per cup. If you are using a culture starter pack, follow the directions on the pack. This is called inoculation.
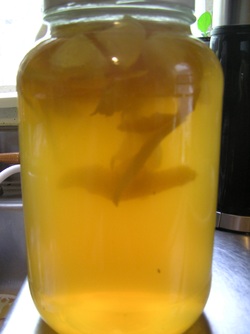
4. Keep your milk warm! Maintain the 110 degrees for as long as possible. The larger the batch, the better it will hold the heat, so this will be more difficult with smaller batches. I used a hot water bath to maintain 110 degrees for the first 10 minutes after inoculation, but that is because, as an experiment, my batch was only 2 cups. Wrap the batch in a towel or blanket and put it somewhere it can sit undisturbed for the next 10 – 18 hours. About 16 hours is ideal, but I forgot about mine, and it sat nearly 20 hours and was still fine. I used my microwave. Even though you want to keep it warm, keep it away from heat sources. Do not reheat at this point, as overshooting your mark will kill your cultures, and you will have to start all over again. Any time that you see the whey (cloudy water) separating from the curd (your skyr) you can move on to the next step.
5. Place the cheese cloth over the second container and secure it so that it doesn’t fall inside. If you wish, put a colander under the cheesecloth for support. Pour the milk through the cheese cloth (and colander, if used) and put it in the fridge. It will need to drip for a few hours, up to a day. As an alternative, you can use a paper coffee filter in a funnel for a small batch. You may have to top it off occasionally as it strains into a glass.
6. Spoon the skyr out of the cheese cloth into a container for storage. This can be individual mason jars, Tupperware, or any other container you wish to use. It should keep for up to about 2 weeks!
That’s all there is to it! Skyr can be served in porridge, mixed or topped with fruit or jams or jellies, sprinkled with brown sugar or drizzled with honey, or as s substitute for sour crème at dinner. Out of the 2 cups of 2% milk that I started with, I ended up with about 1 ½ servings of skyr and about 1 cup of whey, which has many other uses, such as ricotta cheese. Save it for later use of you want, or just dump it if not. Right now, skyr cost about $2 for a single serving. A half-gallon of organic milk cost about $3.50, so by making your own, you are saving a few bucks. Even regular yogurt cost about a dollar a serving, which can still be beat by making your own. Judging by my own experiment, the quality is far superior, as well.
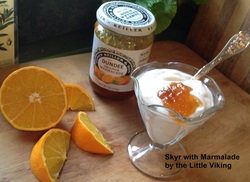
I enjoyed my skyr with brunch, and prepared it with a spoonful of marmalade. I like mine spicy with bits of rind, unlike most found in the United States, that are just orange flavored jelly. The truth is, though, that the sky is the limit! I’d love hear from anyone making skyr in the comment section below, whether it’s this recipe or another. Let me know what you think!
Go in Frith!
My first attempt did not get followed through to completion because of being ill, and I dumped the batch. Even though it smelled and tasted right, the consistency was too thin. It sat around for nearly a week, and I felt that was too long.
My second batch was made with some slight changes, and this morning, I enjoyed it as part of second breakfast. Here, I am sharing the BASIC recipe that I used. I say basic because it is my desire for you to find your own way instead of reproducing exactly what I have done. This recipe will leave you with a basic skyr that will taste like something like plain yogurt or sour crème. You should be able to use it in exactly the same ways. For example, in a dish with a sweet fruit topping, maybe a dusting of brown sugar, or plain over a baked potato with chives and bacon bits. My point is, take this as a framework, and experiment! I’d love to hear how yours turns out! I don’t recommend this recipe for any less than 3 cups of milk. I did this with 2 cups, and ended up with about 12 ounces of skyr, which is 1 ½ to 2 servings of typical yogurt. You will also notice, as I did, that if you homebrew, you already have most of what you need for this recipe!
What you need:
Milk – 2%, whole, vitamin D, or raw is best, from a cow, although other animals milks should work, also. Be sure it does not say “ultra pasteurized” on the label. Pasteurized is OK.
Culture Starter – You can buy a starter from anywhere that sells cheese making supplies. You may have to do a bit of research to find the right one. Alternatively, buy a cup of skyr from a grocery store. Most higher-end grocers carry it or can get it. Be sure it contains live cultures. (If you continue to make skyr on a constant basis, this is a one-time purchase. Your previous batch can serve as a starter for your new batch.)
Food Thermometer – Preferably digital, but you don’t need anything fancy, as long as it reads room temperature up to about 200 degrees Fahrenheit.
A stainless steel pot – Make sure it is of a size that reflects how much you intend to make.
Whisk
A second container of similar size – Can be anything.
Cheese cloth – for straining your curd from the whey.
Colander (optional)
Towel or Blanket – to keep your batch warm while the cultures do their work.
Rennet (optional) – If you have trouble thickening the curd, or if you like yours thicker than the final product here, you can use rennet. Follow the directions with the rennet. I didn’t use it.
Something in which to store the final product. Twelve 12oz mason jars is ideal, not too expensive, and reusable.
Instructions:
1. Put your milk into the stainless steel pot and heat it gently on the stove to 180 degrees Fahrenheit. This is the point that there are small bubbles appearing, the very beginning of boiling. Keep stirring gently with the whisk so that the milk heats evenly and doesn’t burn on the bottom.
2. Turn off the burner and let it cool to 110 degrees Fahrenheit. Either let it sit on the stove and check periodically, or you can set the whole pot, covered, into a sink or other container filled with cold water. Regardless of how cooling takes place, watch the temperature closely. Check it every 5-10 minutes on the stove, and constantly in the water bath. If it cools to lower than 110 degrees, put it back on the heat, but only long enough to raise it back to 110 degrees.
3. Add your starter to the 110 degree milk and mix in thoroughly. I used commercial skyr for a starter, and added a tablespoon per cup. If you are using a culture starter pack, follow the directions on the pack. This is called inoculation.
4. Keep your milk warm! Maintain the 110 degrees for as long as possible. The larger the batch, the better it will hold the heat, so this will be more difficult with smaller batches. I used a hot water bath to maintain 110 degrees for the first 10 minutes after inoculation, but that is because, as an experiment, my batch was only 2 cups. Wrap the batch in a towel or blanket and put it somewhere it can sit undisturbed for the next 10 – 18 hours. About 16 hours is ideal, but I forgot about mine, and it sat nearly 20 hours and was still fine. I used my microwave. Even though you want to keep it warm, keep it away from heat sources. Do not reheat at this point, as overshooting your mark will kill your cultures, and you will have to start all over again. Any time that you see the whey (cloudy water) separating from the curd (your skyr) you can move on to the next step.
5. Place the cheese cloth over the second container and secure it so that it doesn’t fall inside. If you wish, put a colander under the cheesecloth for support. Pour the milk through the cheese cloth (and colander, if used) and put it in the fridge. It will need to drip for a few hours, up to a day. As an alternative, you can use a paper coffee filter in a funnel for a small batch. You may have to top it off occasionally as it strains into a glass.
6. Spoon the skyr out of the cheese cloth into a container for storage. This can be individual mason jars, Tupperware, or any other container you wish to use. It should keep for up to about 2 weeks!
That’s all there is to it! Skyr can be served in porridge, mixed or topped with fruit or jams or jellies, sprinkled with brown sugar or drizzled with honey, or as s substitute for sour crème at dinner. Out of the 2 cups of 2% milk that I started with, I ended up with about 1 ½ servings of skyr and about 1 cup of whey, which has many other uses, such as ricotta cheese. Save it for later use of you want, or just dump it if not. Right now, skyr cost about $2 for a single serving. A half-gallon of organic milk cost about $3.50, so by making your own, you are saving a few bucks. Even regular yogurt cost about a dollar a serving, which can still be beat by making your own. Judging by my own experiment, the quality is far superior, as well.
I enjoyed my skyr with brunch, and prepared it with a spoonful of marmalade. I like mine spicy with bits of rind, unlike most found in the United States, that are just orange flavored jelly. The truth is, though, that the sky is the limit! I’d love hear from anyone making skyr in the comment section below, whether it’s this recipe or another. Let me know what you think!
Go in Frith!


 RSS Feed
